

Buttercream cake is the answer when you want something cheerful on a regular day, but you do not want to wrestle with a complicated recipe. I have had those moments where I promised dessert, looked at the clock, and instantly regretted my big mouth. This is the cake I make when I need a win that feels like a bakery treat, but still fits into real life. It is sweet, fluffy, and forgiving, which is basically my favorite kind of baking. If you have ever stared at a plain cake and thought, how do I make this look cute fast, you are in the right place.
What is American Buttercream Frosting?
American buttercream frosting is the classic, super simple frosting made with butter and powdered sugar. It is the one most of us grew up eating on birthday cakes, cupcakes, and those grocery store sheet cakes that somehow taste like pure childhood. It is sweet, stable, and easy to tint with food coloring, which makes it perfect for decorating.
I like it because it does not require any cooking or fancy steps. You basically whip it up and you are ready to go. It is also pretty sturdy, so if you are frosting a cake for a party and it is going to sit out for a bit, it tends to behave.
Why it works for beginners
Here is the real reason I keep coming back to it: you can mess up a little and still save it. Too thick? Add a splash of milk. Too soft? Add a bit more powdered sugar. It is not like some frostings where one wrong move and it turns into a sad soup.
Also, if you like dessert recipes that feel cozy and familiar, you might also love this cinnamon roll poke cake. It has that same comfort factor, just in a different direction.

How to make American Buttercream
This is the part where I tell you my biggest secret: I used to overthink buttercream. I thought it needed special tools, special butter, special everything. Nope. You need a bowl, a mixer if you have one, and a little patience while it fluffs up.
What you will need
- 1 cup unsalted butter, softened (2 sticks)
- 3 to 4 cups powdered sugar (start with 3, add more if needed)
- 2 to 3 tablespoons milk or heavy cream
- 2 teaspoons vanilla extract
- Pinch of salt (seriously, do not skip this)
Directions
- Beat the softened butter for 2 to 3 minutes until it looks lighter and creamy.
- Add powdered sugar 1 cup at a time, mixing slowly at first so you do not get a sugar cloud.
- Pour in vanilla, salt, and 2 tablespoons milk or cream.
- Beat for another 2 to 3 minutes until fluffy. Add a little more milk if it feels too thick.
- Taste it. If it is too sweet, add a tiny pinch more salt. If it needs more flavor, add a touch more vanilla.
Quick texture guide: For spreading on a cake, you want it smooth and easy to swipe. For piping rosettes, you want it a bit thicker so it holds shape. I usually hold back the last tablespoon of milk until I know what I am doing with it.
And since I am always baking in real life, here is my honest warning: if your butter is too warm, the frosting will feel greasy and loose. If your butter is too cold, it will look chunky. Softened means you can press it with your finger and it gives a little, but it should not look shiny or melted.
One more thing. If you are planning a full dessert spread, pair your cake day with something fun like churro cheesecake. Cinnamon plus buttercream nearby on the table is not a bad idea.

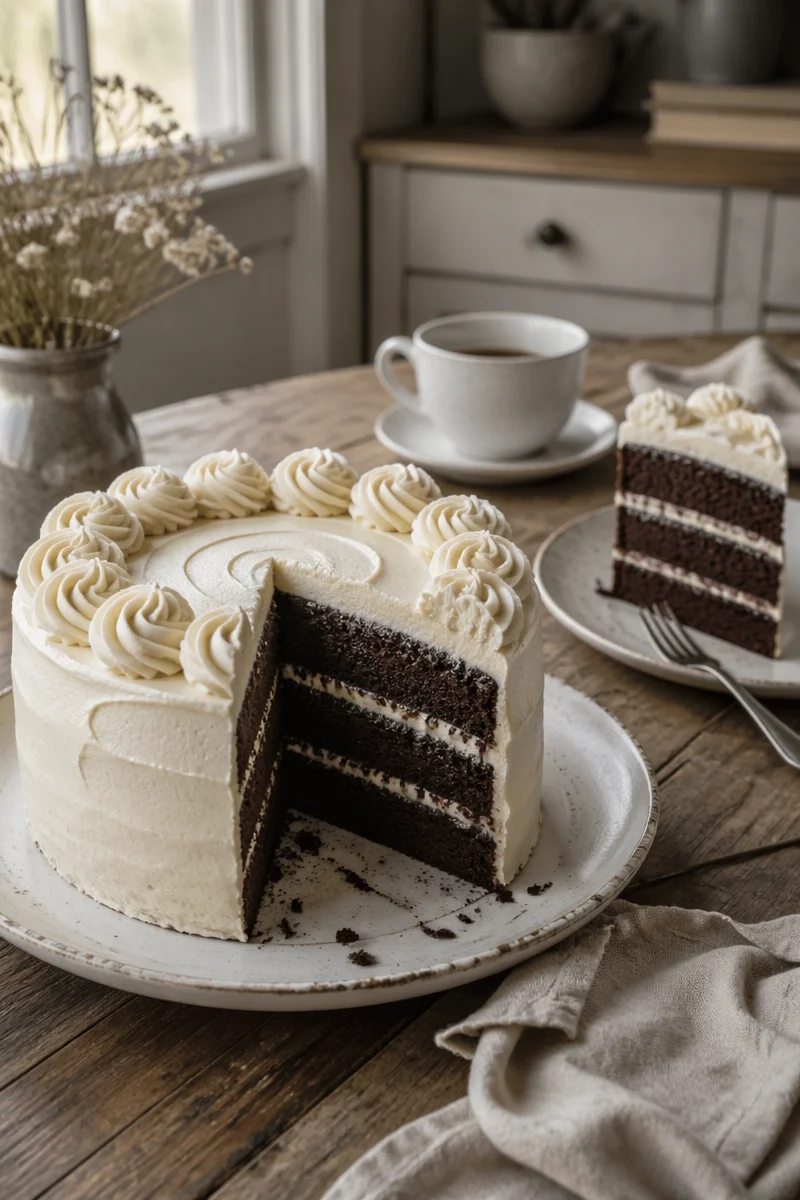
How to make a rosette cake
A rosette cake looks fancy, but it is basically swirls of buttercream cake frosting piped all over the outside. The first time I made one, I thought it would be a disaster. It was not perfect, but everyone acted like I bought it from a cute bakery, and I did not correct them.
What you need: a piping bag and a large star tip. If you do not have a piping bag, you can use a sturdy zip top bag and snip a corner, but the star tip is what gives that classic rosette look.
My easy rosette method
Start with a cooled, crumb coated cake. Crumb coat just means a thin layer of frosting to trap crumbs. Pop it in the fridge for 15 to 20 minutes so it firms up. Then:
Hold your piping bag at a 90 degree angle to the cake. Start in the center of where you want the rosette, swirl outward in a tight circle, and stop with a little pull away. Repeat. Keep going until the sides are covered, then do the top. If you mess up one rosette, just pipe another right next to it. Your eyes will not obsess over one swirl the way your brain does.
“I tried your rosette steps for my daughter’s birthday and I cannot believe I actually pulled it off. The frosting was fluffy, the rosettes held their shape, and people asked me where I ordered the cake.”
If you want an extra cute vibe for a party table, take a peek at these vintage Australian pink jelly coconut cakes. They are the kind of thing that makes people say ooh before they even take a bite.
Tips for decorating cakes
Decorating can be the fun part or the stressful part, depending on your mood and how much time you have. I am usually somewhere in the middle, so I lean on these simple rules to keep things calm and cute.
My no panic decorating tips
Chill your cake layers. Cold cake is easier to frost. If you can, wrap layers and chill them for 30 minutes. Less crumbs, less sliding.
Do a crumb coat. I know I mentioned it earlier, but it really makes everything smoother. Especially for buttercream cake that you want to look clean.
Use a tall glass for piping bags. Put the bag in a glass, fold the top over the rim, and spoon frosting in. It keeps your hands cleaner and your sanity intact.
Keep a small bowl of warm water nearby. Dip your spatula in warm water, wipe it dry, then smooth the frosting. It helps a lot with clean edges.
Do not fight air bubbles. If your frosting has bubbles, mix it slowly for a minute at the end, or press it against the side of the bowl with a spatula. It makes piping look smoother.
If you are decorating and your kitchen is warm, take breaks. Put the cake in the fridge for 10 minutes. Put the frosting bowl in the fridge too. American buttercream likes a cooler room, and so do I.
Best uses for American Buttercream
American buttercream is not trying to be subtle. It is sweet and proud of it, and that is why it pairs best with cakes that can handle it. When I bake a buttercream cake, I am leaning into that classic birthday cake feeling.
My favorite ways to use it
Layer cakes: Vanilla, chocolate, funfetti, you name it. It stacks well and holds shape.
Cupcakes: It pipes tall swirls without collapsing.
Rosette and textured designs: Super dependable for those pretty patterns.
Filling for cookie sandwiches: Just do not overfill or it squishes out.
Simple party cakes: When you need a dessert that looks like effort even if you made it on a Tuesday night.
Flavor ideas are endless, too. Add melted and cooled chocolate, a spoon of peanut butter, a little espresso powder, or a few tablespoons of berry jam. Just add extras slowly so the texture stays thick enough to spread or pipe.
One last tip from my own trial and error: if you want it less sweet, you can reduce the sugar a bit, but it will be softer. My compromise is keeping the sugar but adding salt and a little extra vanilla. It balances things without messing up the structure.
Common Questions
Can I make American buttercream ahead of time?
Yes. Store it in an airtight container in the fridge for up to a week. Let it come to room temp, then re whip it for a minute to make it fluffy again.
Why is my buttercream grainy?
Usually it is the powdered sugar not mixing long enough, or the butter being too cold. Beat it a bit longer and make sure the butter is properly softened next time.
How do I fix buttercream that is too runny?
Chill it for 10 to 15 minutes, then beat again. If it is still loose, add more powdered sugar a few tablespoons at a time.
Do I have to use a stand mixer?
Nope. A hand mixer works great. You can do it by hand too, but it is a workout and it will not get quite as fluffy.
How do I keep a decorated cake from smudging in transport?
Chill the finished cake until the frosting feels firm to the touch. Use a box that fits the cake snugly, and keep it level in the car.
A sweet little send off
If you take anything from this post, let it be this: buttercream cake does not have to be complicated to feel special. Get your butter softened, whip it until fluffy, and give yourself permission to keep the decorating simple. If you want to compare methods, I like checking trusted guides like Simple Vanilla Buttercream (American Buttercream Recipe), and for flavor inspiration that feels a little different, this Black Tea Cake with Honey Buttercream – Pastry Affair is such a cozy read. And if you are building your cake skills from the base up, The Perfect Vanilla Cake with Buttercream Frosting – elisabeth & butter is a great one to save.
Now go make that buttercream cake, swirl on those rosettes, and enjoy the kind of sweet happiness that makes your kitchen feel like home. 
American Buttercream Frosting
Ingredients
Frosting Ingredients
- 1 cup unsalted butter, softened (2 sticks) Butter should be soft, not melted.
- 3 to 4 cups powdered sugar Start with 3 cups, add more if needed.
- 2 to 3 tablespoons milk or heavy cream Adjust for desired consistency.
- 2 teaspoons vanilla extract For flavor.
- 1 pinch salt Balances sweetness.
Instructions
Preparation
- Beat the softened butter for 2 to 3 minutes until it looks lighter and creamy.
- Add powdered sugar 1 cup at a time, mixing slowly at first to avoid a sugar cloud.
- Pour in vanilla, salt, and 2 tablespoons of milk or cream.
- Beat for another 2 to 3 minutes until fluffy. Add more milk if it feels too thick.
- Taste and adjust sweetness with a pinch of salt or more vanilla as needed.
Decorating a Rosette Cake
- Start with a cooled, crumb coated cake. Chill for 15 to 20 minutes.
- Hold your piping bag at a 90 degree angle and start in the center of where you want the rosette, swirling outward in a tight circle.
- Repeat until the sides and top of the cake are covered with rosettes.